WSL
概述
参考:
安装 WSL
现在默认使用 WSL2,也推荐安装和使用 WSL2。
打开 “启用或关闭Windows功能”,开启 “适用于 Linux 的 Windows 子系统” 和 “虚拟机平台”。

之后在 Microsoft Store 中使用 Windows Susystem for Linux 关键字搜索并安装 WSL 的最新版。
若不开启“虚拟机平台” 或 安装最新版 WSL,在安装后启动时,将可能会出现下图错误

安装 Linux 发行版
安装 Ubuntu 发行版的 WSL
wsl --install -d Ubuntu --location D:\wsl\ubuntu
安装完成后的效果如下(截至 2026-09-27):
PS D:\tmp> wsl --list --all -v
  NAME      STATE           VERSION
* Ubuntu    Stopped         2
PS D:\tmp> Get-ChildItem 'HKCU:\SOFTWARE\Microsoft\Windows\CurrentVersion\Lxss'

    Hive: HKEY_CURRENT_USER\SOFTWARE\Microsoft\Windows\CurrentVersion\Lxss

Name                           Property
----                           --------
{8da0eb82-dda5-426e-b1d1-b0326 State               : 1
05f666d}                       DistributionName    : Ubuntu
                               Version             : 2
                               BasePath            : D:\wsl\ubuntu
                               Flags               : 15
                               DefaultUid          : 0
                               RunOOBE             : 1
                               VhdFileName         : ext4.vhdx
                               Flavor              : ubuntu
                               OsVersion           : 26.04
                               Modern              : 1
                               ShortcutPath        : C:\Users\DesistDaydream\AppData\Roaming\Microsoft\Windows\Start Menu\Ubuntu.lnk
                               TerminalProfilePath : C:\Users\DesistDaydream\AppData\Local\Microsoft\Windows Terminal\Fragments\Microsoft.WSL\{43d032ed-a194-5119-b8c9-2678fde75d34}.json
导入发行版,使用本地 VHD 文件(直接使用源文件,不会创建新的 .vhdx 文件)
wsl --import-in-place Ubuntu D:\wsl\ubuntu\ext4.vhdx
# 导入的发行版默认使用 root 用户登录,若想使用之前的非 root 用户需要设置一下
wsl --manage Ubuntu --set-default-user <用户名>
导入效果如下(截至 2026-09-27):
PS D:\tmp> wsl --import-in-place Ubuntu D:\wsl\ubuntu\ext4.vhdx
操作成功完成。
PS D:\tmp> Get-ChildItem 'HKCU:\SOFTWARE\Microsoft\Windows\CurrentVersion\Lxss'

    Hive: HKEY_CURRENT_USER\SOFTWARE\Microsoft\Windows\CurrentVersion\Lxss

Name                           Property
----                           --------
{c309f3b3-c68c-47e2-b1d8-2736b State               : 1
e5221d9}                       DistributionName    : Ubuntu
                               Version             : 2
                               BasePath            : \\?\D:\wsl\ubuntu
                               Flags               : 15
                               DefaultUid          : 0
                               RunOOBE             : 0
                               VhdFileName         : ext4.vhdx
                               Flavor              : ubuntu
                               OsVersion           : 22.04
                               Modern              : 1
                               ShortcutPath        : C:\Users\DesistDaydream\AppData\Roaming\Microsoft\Windows\Start Menu\Ubuntu.lnk
                               TerminalProfilePath : C:\Users\DesistDaydream\AppData\Local\Microsoft\Windows Terminal\Fragments\Microsoft.WSL\{f2f4fb13-5f14-5917-afb3-966191939623}.json
导入发行版,使用 tar 文件(源文件不动,创建一个新的 .vhdx 文件)
wsl --import Ubuntu D:\wsl\ubuntu D:\wsl\tmp\ext4.vhdx --vhd
常见问题
若安装后 linux 无法启动,报错:WslRegisterDistribution failed with error: 0x800701bc
(可选)设置 wsl 版本
wsl --set-default-version 2
忘记密码时,可以在 PowerShell 中使用 wsl 命令直接以 root 用户登录 wsl
wsl.exe --user root
更多常见问题,可以参考官方文档,疑难解答
访问 WSL 文件系统
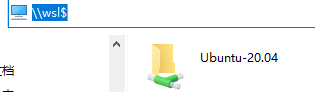
在 Windows 资源管理器中,访问 \\wsl$ 即可访问 WSL 文件系统
WSL 关联文件与配置
参考:
Windows 下的关联文件
X.vhdx # 类似 qcow2 这种 KVM/QEMU 镜像,是 WSL 的虚拟机镜像。
该文件早期存放在 %LOCALAPPDATA%/Packages/CanonicalGroupLimited.XXXXX/LocalState/ext4.vhdx,通过应用商店安装后的程序数据保存路径。e.g. CanonicalGroupLimited.Ubuntu_79rhkp1fndgsc。其中还包括一些配置信息。后来那些配置信息都不在文件中,改到注册表中保存。
早期安装的 WSL 可以使用 Get-AppxPackage *Ubuntu* | Remove-AppxPackage 这种方式卸载
HKEY_CURRENT_USER\SOFTWARE\Microsoft\Windows\CurrentVersion\Lxss\${GUID}\ # 注册表键。保存了 WSL 发行版的各种信息。GUID 是每个 WSL 发行版的唯一标识符。
- ./BasePath # .vhdx 文件所在目录
- ./DistributionName # 发行版的名称
- State, Version, etc. # 各种元数据
%UserProfile%/.wslconfig # 用于在作为 WSL2 版本运行的所有已安装 Linux 发行版中全局配置设置。
Linux 发行版下的关联文件
/etc/wsl.conf # 作为 Unix 文件存储,用于为每个发行版配置各自独立的设置。
wsl 命令行工具
参考:
Syntax(语法)
wsl [OPTOINS]
OPTONS
- -d, –distribution STRING # 指定要运行的发行版
- -u, –user STRING # 使用指定的用户运行发行版。可以直接以 root 用户运行。常用来在忘记密码时候使用。
WSL 子系统管理选项
- –install [DISTRIBUTION] [OPTIONS] #
- –shutdown # 立即终止所有正在运行在 wsl 子系统上的 Linux 发行版
- –status # 显示 wsl 子系统的状态。
- –update # 更新 wsl 子系统程序包。
发行版管理选项
- -l, –list [OPTIONS] # 列出发行版,可以根据子参数指定需要列出哪些发行版。
- –all # 列出所有
- -o, –online # 列出所有可以安装的发行版。
- –set-default-version #
- -s, –set-default DISTRO # 将指定的发行版设为默认
- –unregister DISTRO # 将指定的发行版取消注册。
- Attention:若从应用商店删除特定发行版后再安装失败的话,需要通过 wsl 命令手动 unregister 一下,即可成功。
最佳实践
C:\Users\DesistDaydream\vscode-remote-wsl\stable\ 定时清理这个目录,VSCode 每次更新都下载一个包,时间久了占好几 G,而且加载 WSL 插件会变慢。
为 WSL 配置代理
设置为本地计算机的 Clash
#!/bin/bash
#
export hostip=$(cat /etc/resolv.conf |grep -oP '(?<=nameserver\ ).*')
export http_proxy="http://${hostip}:7890"
export https_proxy="http://${hostip}:7890"
export all_proxy="sock5://${hostip}:7890"
export ALL_PROXY="sock5://${hostip}:7890"
意见反馈
这个页面对您有帮助吗?
Glad to hear it! Please tell us how we can improve.
Sorry to hear that. Please tell us how we can improve.