故障处理技巧
概述
参考:
Kubernetes 作为分布式容器调度系统荣,难免出现问题。
Kubernetes 让运维管理设备的方式发生了根本的转变,从一台一台设备登录,变为统一管理。在 1.19 版本官方文档的 debug 章节中,提到了这么一句话:
If none of these approaches work, you can find the host machine that the pod is running on and SSH into that host, but this should generally not be necessary given tools in the Kubernetes API. Therefore, if you find yourself needing to ssh into a machine, please file a feature request on GitHub describing your use case and why these tools are insufficient.
Kubernetes 集群会积极推进让维护工作不再通过登录每一台设备才能进行调试。
Pod 无法启动时,让其强制启动
当我们发现 Pod 无法启动时,除了日常通过 kubectl 命令,查看日志等常规手段以外,还有可能需要让 Pod 强制启动,以便更深入排障
首先,编辑 Pod 的控制器,删除各种探针
然后利用 pod.spec.containers.tty 和 pod.spec.containers.command 两个字段,为 Pod 分配一个终端,并保持 Pod 运行状态
apiVersion: apps/v1
kind: Deployment
metadata:
  name: myapp-bj-test
  namespace: test
spec:
  ......
  template:
    metadata:
      ......
    spec:
      containers:
      - command: [sh]
        tty: true
        ......
    ......
这时,我们就可以通过 kubectl exec 命令进入这个容器中,进行各种调试了。
Kubernetes Debug
参考:
曾几何时,我们将自己的应用运行在 Kubernetes 上,每当出现容器异常崩溃时,我们往往都是一边重启容器,一边面对崩溃的容器无从下手。通常在业务研发自己 build 的镜像内包含了 shell,我们还能通过在 command 中嵌入一个[“sleep”, “3600”]命令来阻塞容器内服务启动,不过也有时候会出现不知道从哪里冒出来一个 distroless 镜像,这时可能最先崩溃的就是运维了。那是一种运维这个职业自诞生以来,第一次感受到手足无措并脱离掌控的无助感。于是在 k8s 环境下无法 debug 容器的梗开始在坊间广为吐槽。
第一个打破魔咒的是 kubectl-debug,它包含了 agent 和 debug-tools 两个部分。也是目前全网内搜到文档最全的解决方案。不过目前它的开发似乎已经停止,上一次提交还是在 8 个月之前,而最近一次 Release 版本也停留在两年前。更难以接受的是,当前它无法被集成在容器运行时为 Containerd 的 k8s 集群。
尽管 kubectl-debug 曾经确实是一款非常好用的容器调试工具,但如今 Kubernetes 已经有了更好的容器调试解决方案,Ephemeral Containers
Ephemeral Containers
Ephemeral Containers 字如其名,它就是一个临时容器。这是一个自 Kubernetes v1.16 中作为 alpha 引入的新功能,虽然当前它还没有 GA,不过自从在 Kubernetes v1.18 之后,在 kubectl 内已经集成了 debug 客户端,我们几乎可以完整的使用并体验它的新特性。 临时容器的目标是为 Kubernetes 用户提供一个故障诊断工具,同时具备满足以下需求:
- 作为一个开箱即用的平台化工具
- 不依赖于已经包含在容器镜像中的工具
- 不需要直接登陆计算节点(可以通过 Kubernetes API 的管理访问 Node)
不过也有东西是临时容器不计划支持的,比如对 windows 上启用临时容器就不太友好。
启用临时容器的特性也非常简单,在 kubernetes v1.16 之后的版本中将启动参数–feature-gates=EphemeralContainers=true 配置到 kube-api 和 kubelet 服务上重启即可。
在 1.20 之前,kubectl debug 工具被放在 alpha 中,注意不同版本的命令操作差别 这里推荐使用客户端为 1.20+的版本体验会更好
那么我们有了 Ephemeral Containers 能做哪些事情呢?
1. POD Troubleshooting
如上文所说,我们可以直接通过 kubectl debug 命令进行容器调试。最直接简单的对一个 pod 进行调试命令如下:
kubectl debug mypod -it --image=busybox
默认情况下用户不指定临时容器名称的话,debug 容器名称就由 kubectl 自动生成一个唯一 id 的名称。如果用户需要自己指定容器名称则使用
kubectl debug mypod -c debugger --image=busybox
有了临时容器除了日常 debug 功能外,我们可以扩展出很多新花样的玩法。比如批量跑某个命名空间下的安全扫描的脚本而不用干扰原容器。
for pod in $(kubectl get -o name pod);
do
    kubectl debug --image security/pod_scanner -p $pod /sanner.sh
done
2. POD Troubleshooting by Copy
对于没有开启 Ephemeral Containers 特性的集群,我们就只能通过复制模式来调试容器。它的原理是复制一个指定 pod 的新容器,并将 debug 作为 sidecar 跟随新容器一起启动。通过这种方式也能达到曲线救国的目的。此种方式的几个参数还是挺有意思:
--copy-to   指定新pod的名称
--replace=true   是否删除原容器
--same-node=true  是否调度到和原容器一样的node上
--share-processes=true  是否共享容器pid空间
例如我们就可以启动一个跟需要调试 pod 一样配置的 debug 容器如下:
kubectl debug mypod -it \
--container=debug \
--image=busybox \
--copy-to=my-debugger \
--same-node=true \
--share-processes=true
3. Node Troubleshooting
对!你没看错!利用 Ephemeral Containers 还能对 Worker 节点进行调试。当以节点为目标调用时,kubectl debug 将创建一个带有 node 名称的 pod,并且调度到该节点。同时该容器还具备了 hostIPC、hostNetwork 和 hostPID 这些特权模式。不可思议的是 Worker 节点的根文件系统还被 mount 到了 debug 容器下的/host 目录下。 直接执行这个命令就能 debug 主机。
kubectl debug node/mynode -it --image=busybox
Debug 镜像
工欲善其事,必先利其器。不管怎样我们都需要一套工具完善的 debug 镜像,在处理问题时能够得心应手。虽然网上也有不少 debug 镜像,不过都还是不如自己构建来的畅快。 这里小白分享一个 Debug 镜像的 Dockerfile,大家可以根据自己条件修改即可。
FROM golang:alpine as grpcurl
ENV XXX 添加 go 代理
RUN apk update \
  && apk add --virtual build-dependencies git \
  && apk add bash curl jq \
  && go get -u github.com/fullstorydev/grpcurl \
  && go install github.com/fullstorydev/grpcurl/cmd/grpcurl@latest

FROM alpine:latest
RUN sed -i 's/dl-cdn.alpinelinux.org/mirrors.tuna.tsinghua.edu.cn/g' /etc/apk/repositories && \
    apk update && \
    apk add --no-cache vim bash tcpdump curl wget strace mysql-client iproute2 redis jq iftop tzdata tar nmap bind-tools htop && \
    ln -sf /usr/share/zoneinfo/Asia/Shanghai /etc/localtime
RUN wget -O /usr/bin/httpstat https://github.com/davecheney/httpstat/releases/download/v1.0.0/httpstat-linux-amd64-v1.0.0 && \
    chmod +x /usr/bin/httpstat
COPY --from=grpcurl  /go/bin/grpcurl /usr/bin/grpcurl
ENV TZ=Asia/Shanghai LC_ALL=C.UTF-8 LANG=C.UTF-8 LANGUAGE=C.UTF-8
ENTRYPOINT [ "/bin/bash" ]
docker build -t lchdzh/k8s-debug:v1 .
kubectl debug -n ingress-controller nginx-hw-cloud-ingress-nginx-controller-85m49 -it \
--container=debug \
--image=lchdzh/k8s-debug:v1 \
--copy-to=my-debugger \
--same-node=true \
--share-processes=true
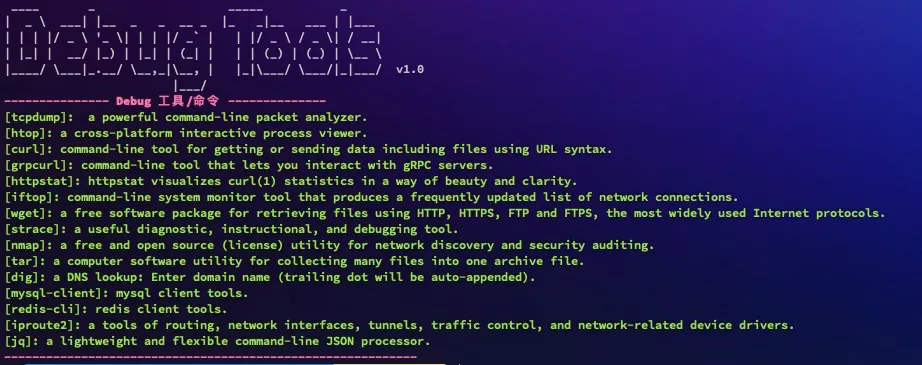
debug 镜像内支持的工具包如下图
总结
本文主要讲述了 kubernetes 在 v1.18 版本之后被提上 alpha 的 Ephemeral Containers 特性,通过临时容器我们可以 debug 容器,甚至还可以 debug 主机。它确实是一个非常方便和足以替代 kubectl-debug 的解决方案。不过,目前临时容器对于用户权限这块并没有特别的说明,特别是用特权模式调试主机的时候,希望后面能够借助 PSP(Pod Security Policy)做一个额外的补充。
反馈
此页是否对你有帮助?
Glad to hear it! Please tell us how we can improve.
Sorry to hear that. Please tell us how we can improve.