Alertmanager
概述
参考:
Prometheus Alert 介绍详见 Prometheus Server Alert 说明
Alertmanager 处理由客户端应用程序(例如 Prometheus 服务器)发送的警报。它负责将重复数据删除,分组和路由到正确的接收者集成,例如电子邮件,PagerDuty 或 OpsGenie。它还负责沉默和禁止警报。
Alertmanager 特性
Prometheus 发送过来的每一个告警,都会由 Alertmanager 进行重复数据删除、分组、路由到正确的接收者(e.g.邮件、钉钉等)上。
Alertmanager 除了提供基本的告警通知能力以外,还主要提供了如:分组、抑制以及静默等告警特性:
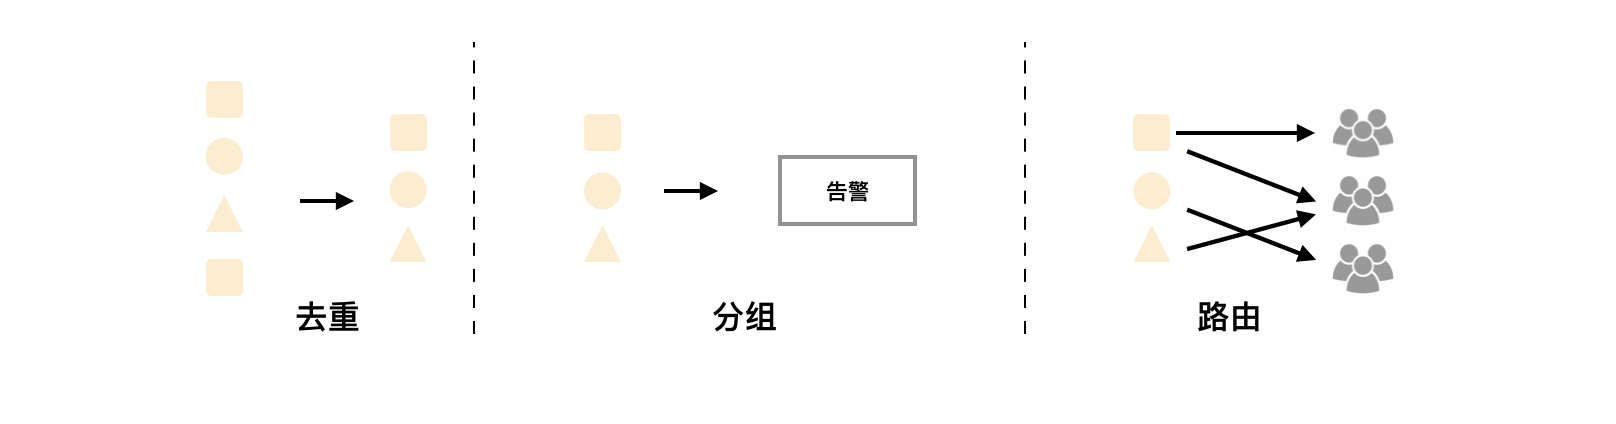
分组
分组机制可以将详细的告警信息合并成一个通知。在某些情况下,比如由于系统宕机导致大量的告警被同时触发,在这种情况下分组机制可以将这些被触发的告警合并为一个告警通知,避免一次性接受大量的告警通知,而无法对问题进行快速定位。
例如,当集群中有数百个正在运行的服务实例,并且为每一个实例设置了告警规则。假如此时发生了网络故障,可能导致大量的服务实例无法连接到数据库,结果就会有数百个告警被发送到 Alertmanager。
而作为用户,可能只希望能够在一个通知中中就能查看哪些服务实例收到影响。这时可以按照服务所在集群或者告警名称对告警进行分组,而将这些告警内聚在一起成为一个通知。
告警分组,告警时间,以及告警的接受方式可以通过 Alertmanager 的配置文件进行配置。
抑制
抑制是指当某一告警发出后,可以停止重复发送由此告警引发的其它告警的机制。
例如,当集群不可访问时触发了一次告警,通过配置 Alertmanager 可以忽略与该集群有关的其它所有告警。这样可以避免接收到大量与实际问题无关的告警通知。
抑制机制同样通过 Alertmanager 的配置文件进行设置。
静默
静默提供了一个简单的机制可以快速根据标签对告警进行静默处理。如果接收到的告警符合静默的配置,Alertmanager 则不会发送告警通知。
静默设置需要在 Alertmanager 的 Web 页面上进行设置。
Alertmanager 告警分组
每一个告警进入 Alertmanager 后,都会进行分组处理,可以根据规则将多条告警合并为一个通知。这是为了可以让相关的告警可以合并在一起,一次性收集和发送,以便运维人员的故障排查。
Alertmanager 告警路由
告警路由,顾名思义,路由就是根据“目的接收者”将每个告警发送到指定的接收者上的过程。
每一个告警进入到 Alertmanager 都会由顶级的 route 进入路由树,需要注意的是顶级的 route 必须匹配所有告警(即不能有任何的匹配设置 match 和 match_re),在一个路由树中,将每个被路由的目标称为 Node(节点)。
每一个路由都可以定义自己的接受人以及匹配规则。默认情况下,告警进入到顶级 route 后会遍历所有的子节点,直到找到最深的匹配 route,并将告警发送到该 route 定义的 receiver 中。但如果 route 中设置 continue 的值为 false,那么告警在匹配到第一个子节点之后就直接停止。如果 continue 为 true,报警则会继续进行后续子节点的匹配。如果当前告警匹配不到任何的子节点,那该告警将会基于当前路由节点的接收器配置方式进行处理。
其中告警的匹配有两种方式可以选择。一种方式基于字符串验证,通过设置 match 规则判断当前告警中是否存在标签 labelname 并且其值等于 labelvalue。第二种方式则基于正则表达式,通过设置 match_re 验证当前告警标签的值是否满足正则表达式的内容。
如果警报已经成功发送通知, 如果想设置发送告警通知之前要等待时间,则可以通过 repeat_interval 参数进行设置。
Alertmanager 告警模板
告警模板的使用方式详见:告警模板详解
默认情况下 Alertmanager 使用了系统自带的默认通知模板,模板源码可以从 https://github.com/prometheus/alertmanager/blob/master/template/default.tmpl 获得。Alertmanager 的通知模板基于 Go 的模板系统。Alertmanager 也支持用户定义和使用自己的模板,一般来说有两种方式可以选择。
第一种,基于模板字符串。用户可以直接在 Alertmanager 的配置文件中使用模板字符串,例如:
receivers:
- name: 'slack-notifications'
  slack_configs:
  - channel: '#alerts'
    text: 'https://internal.myorg.net/wiki/alerts/{{ .GroupLabels.app }}/{{ .GroupLabels.alertname }}'
第二种方式,自定义可复用的模板文件。例如,可以创建自定义模板文件 custom-template.tmpl,如下所示:
{{ define "slack.myorg.text" }}https://internal.myorg.net/wiki/alerts/{{ .GroupLabels.app }}/{{ .GroupLabels.alertname }}{{ end}}
通过在 Alertmanager 的全局设置中定义 templates 配置来指定自定义模板的访问路径:
# Files from which custom notification template definitions are read.
# The last component may use a wildcard matcher, e.g. 'templates/*.tmpl'.
templates:
  [ - <filepath> ... ]
在设置了自定义模板的访问路径后,用户则可以直接在配置中使用该模板:
receivers:
- name: 'slack-notifications'
  slack_configs:
  - channel: '#alerts'
    text: '{{ template "slack.myorg.text" . }}'

templates:
- '/etc/alertmanager/templates/myorg.tmpl'
Alertmanager 部署
与 prometheus 一样,可以通过二进制安装或者 docker 启动
使用 docker 的方式运行 Alertmanager
获取配置文件
mkdir -p /etc/monitoring
docker run -d --name alertmanager --rm prom/alertmanager
docker cp alertmanager:/etc/alertmanager /etc/monitoring
docker stop alertmanager
运行 Alertmanager
docker run -d --name alertmanager \
  --network host \
  -v /etc/localtime:/etc/localtime \
  -v /etc/monitoring/alertmanager:/etc/alertmanager/config_out \
  prom/alertmanager \
  --config.file=/etc/alertmanager/config_out/alertmanager.yml
部署完成后,Alertmanager 默认监听在 9093 端口上,通过浏览器打开 http://localhost:9093 可以看到如下示例的画面
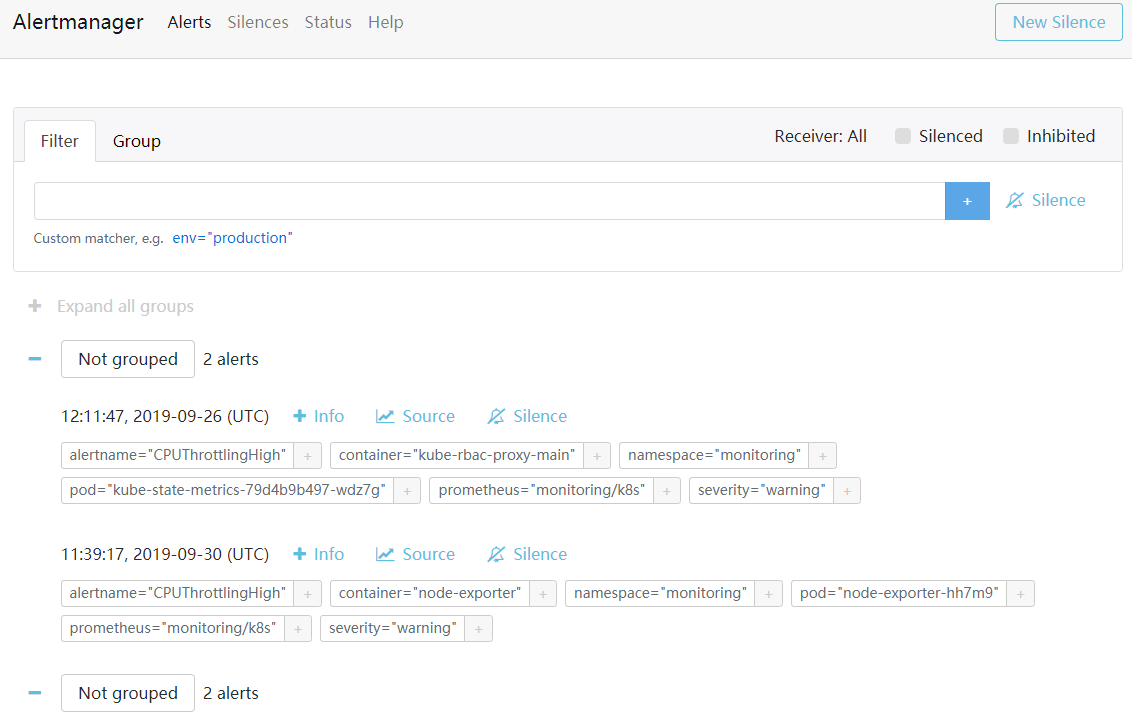
首页 Alerts 标签上显示了从 Prometheus Server 推送过来的每一条告警,可以通过点击告警信息中的 Silence 来让该告警静音(i.e.不再发送告警邮件)
Alertmanager 运行时的标志(Flags)说明
alertmanager 程序在启动时,可以使用一些标志来对程序进行一些基本设定,比如数据存储路径、存储时间等等
- –config.file="/PATH/TO/FILE"# 指定 alertmanager 基本配置文件。 默认 /etc/alertmanager/alertmanager.yml
- –storage.path="/PATH"# 指定存储数据的基础路径。该路径包括告警信息、已经 silences 的告警等信息。
- –data.retention=120h # 数据保存时长。
- –alerts.gc-interval=30m # Interval between alert GC.
- –web.external-url=WEB.EXTERNAL-URL zThe URL under which Alertmanager is externally reachable (for example, if Alertmanager is served via a reverse proxy). Used for generating relative and absolute links back to Alertmanagerzitself. If the URL has a path portion, it will be used to prefix all HTTP endpoints served by Alertmanager. If omitted, relevant URL components will be derived automatically.
- –web.route-prefix=WEB.ROUTE-PREFIX zPrefix for the internal routes of web endpoints. Defaults to path of –web.external-url.
- –web.listen-address=":9093" zAddress to listen on for the web interface and API.
- –web.get-concurrency=0 Maximum number of GET requests processed concurrently. If negative or zero, the limit is GOMAXPROC or 8, whichever is larger.
- –web.timeout=0 Timeout for HTTP requests. If negative or zero, no timeout is set.
- –cluster.listen-address=“0.0.0.0:9094” zListen address for cluster. Set to empty string to disable HA mode.
- –cluster.advertise-address=CLUSTER.ADVERTISE-ADDRESS zExplicit address to advertise in cluster.
- –cluster.peer=CLUSTER.PEER … zInitial peers (may be repeated).
- –cluster.peer-timeout=15s zTime to wait between peers to send notifications.
- –cluster.gossip-interval=200ms zInterval between sending gossip messages. By lowering this value (more frequent) gossip messages are propagated across the cluster more quickly at the expense of increased bandwidth.
- –cluster.pushpull-interval=1m0s zInterval for gossip state syncs. Setting this interval lower (more frequent) will increase convergence speeds across larger clusters at the expense of increased bandwidth usage.
- –cluster.tcp-timeout=10s Timeout for establishing a stream connection with a remote node for a full state sync, and for stream read and write operations.
- –cluster.probe-timeout=500ms zTimeout to wait for an ack from a probed node before assuming it is unhealthy. This should be set to 99-percentile of RTT (round-trip time) on your network.
- –cluster.probe-interval=1s zInterval between random node probes. Setting this lower (more frequent) will cause the cluster to detect failed nodes more quickly at the expense of increased bandwidth usage.
- –cluster.settle-timeout=1m0s zMaximum time to wait for cluster connections to settle before evaluating notifications.
- –cluster.reconnect-interval=10s zInterval between attempting to reconnect to lost peers.
- –cluster.reconnect-timeout=6h0m0s zLength of time to attempt to reconnect to a lost peer.
- –log.level=info Only log messages with the given severity or above. One of: [debug, info, warn, error]
- –log.format=logfmt Output format of log messages. One of: [logfmt, json]
- –version Show application version.
Alertmanager 关联文件配置
/alertmanager/data # 运行时数据保存路径。并不是实时保存,根据命令行配置的时间间隔,定期将数据同步到本地文件系统中
/etc/alertmanager/alertmanager.conf # alertmanager 基本配置文件默认位置。可以通过 –config.file 标志指定其他配置文件
下面是一个基本的 alertmanager.conf 配置文件示例:
# 全局配置环境
global:
  resolve_timeout: 5m # 该参数定义了当Alertmanager持续多长时间未接收到告警后标记告警状态为resolved(已解决)
  # 配置邮件发送信息
  smtp_smarthost: "smtp.163.com:25"
  smtp_from: "ych_1024@163.com"
  smtp_auth_username: "ych_1024@163.com"
  smtp_auth_password: "<邮箱密码>"
  smtp_hello: "163.com"
  smtp_require_tls: false

# 路由配置环境。所有报警信息进入后的根路由,用来设置报警的分发策略
route:
  group_by: ["alertname", "cluster"] # 这里的标签列表是接收到报警信息后的重新分组标签,例如,接收到的报警信息里面有许多具有 cluster=A 和 alertname=LatncyHigh 这样的标签的报警信息将会批量被聚合到一个分组里面
  group_wait: TIME # 当一个新的报警分组被创建后,需要等待至少TIME时间来初始化通知,这种方式可以确保您能有足够的时间为同一分组来获取多个警报,然后一起触发这个报警信息。
  group_interval: TIME # 重复发送报警的设置(报警未消除的重复报警)。当一个组里的报警有变化时,等待'group_interval'时间来发送新的一组报警信息。默认5分钟。
  repeat_interval: TIME # 重复发送报警的设置(报警未消除的重复报警)。一个组里的报警一直没有变化的话,等待'repeat_interval'时间来重新发送他们。默认4小时。
  receiver: STRING # 指定默认的receiver名,如果一个报警没有任何一个routes匹配,则发送给默认的receiver
  routes: # 上面所有的配置参数都由所有子路由继承,并且可以在每个子路由上进行覆盖。
    - receiver: STRING # 指定该子路由要使用的receiver
      group_wait: TIME
      match: # 指定标签名和值,凡是具有该标签名和值的告警由将路由到指定的receiver上
        # 也可以使用 match_re 关键字,来进行正则表达式匹配。LabelValue 可以使用正则来表示
        LabelName: LabelValue

# 接收者配置环境。用于定义分配好路由的告警信息将由谁来接收。
receivers:
  - name: "default" # 指定receiver的名字
    email_configs: # 指定该receiver使用哪种配置
      - to: "desistdaydream@wisetv.com.cn"
        send_resolved: true # 指定是否发送告警已解决的信息。默认为false,i.e.不发送
Alertmanager API
参考:
Alertmanger Development
公众号,深入剖析Alertmanager:解锁告警管理的核心逻辑
反馈
此页是否对你有帮助?
Glad to hear it! Please tell us how we can improve.
Sorry to hear that. Please tell us how we can improve.